Thursday, February 14, 2013

Quick and Easy way to cut a Cantaloupe

One of my son Josh's favorite fruits is Cantaloupe.  I think he would eat it every day if he could.  So after trial and error, this is the quickest and easiest way I have found to get out that sweet tasty goodness for my little guy!


Quick and Easy way to cut a Cantaloupe

First you need to select a good melon.  If it doesn't smell like a cantaloupe it isn't going to taste like a cantaloupe.  When you are at the store smell at the tapered end.  It should be firm and not smooshy and smell like a cantaloupe.  If it doesn't smell, it's not ripe yet.  I don't like to keep uncut cantaloupe's in the fridge.  For the best flavor it is best to leave them on the counter until fully ripe and ready to cut.

When it is ready to cut pull out a good sized cutting board and a large knife.  Cut off each end so it has a flat surface to sit on.


Then, start at the top and slice a piece of the rind off not leaving any of the green (that part is hard and bitter) following the contour of the melon all the way to the end and the rind will fall off on it's own.  Turn the cantaloupe a little and slice off another piece of the rind.  Continue until the melon is completely peeled.


 Stand the Cantaloupe up on one of the flat ends and slice down the middle.


Take a large spoon and scrape out the seeds into the trash can.


Turn one half cut side down and with your knife cut the cantaloupe in half and then from either side of the first cut, make several slices as wide as you want each bite sized piece to be.


Then turn the half and repeat the same process the other way making your little rectangular cube pieces.  I don't mind that mine are rectangles, if you want actual cubes.  Make a horizontal cut in each melon half about half way down in your melon before you start to slice it.


 Scoop up your pieces and place in a serving bowl to enjoy or in an airtight container to keep in the refrigerator.  

Wednesday, February 13, 2013

Apricot Ginger Kielbasa Coins

Weeknights can be crazy.  This is a great 20 minute meal that comes together quickly and will please even those picky eaters in your family who claim, "I don't like sausage."

"It's just a hot dog honey."

"Ok." And then they were gone.

Apricot Ginger Kielbasa Coins

1 tsp olive oil
1 14oz Turkey Polish Kielbasa Sausage
2 Tbsp water
1/2 cup Apricot preserves
1 clove garlic, pressed
1/4 tsp ground ginger

Preheat a large skillet over medium high heat.  Slice the sausage into 1/4 inch disks (coins).  Drizzle the olive oil in the pan and add the sausage.  Cook until lightly browned on both sides, stirring occasionally.

Meanwhile in a small mixing bowl combine the apricot preserves, the garlic, and ginger.  Whisk until smooth.

When the kielbasa is browned reduce the heat to medium and spoon pour in the water, deglazing the pan.  Stir to help the little bits that are stuck to the bottom come off.  Add in the apricot mixture and stir to coat.  Let cook for about 10 minutes stirring frequently so that it doesn't burn.  When the sauce is reduced by half and is darker in color it is ready.  Transfer to a serving bowl.

I usually serve this over cooked white rice.  If you start the rice first, by the time you cut and cook the kielbasa everything is done about the same time.


Tuesday, February 12, 2013

Sweetheart Strawberries and Cream Scones

I think red when it comes to Valentines.  And there is nothing better than using fresh ingredients when you bake.  I found some beautiful strawberries at the store and wanted to make breakfast for my sweetheart because he didn't have to go into work as early as usual.  These are truly a sweet way to start your day.

Print Recipe

Sweetheart Strawberries and Cream Scones

1 1/2 cup flour
1/4 cup granulated sugar
1/4 tsp kosher salt
1 1/2 tsp baking powder
1/4 cup cold butter
generous 1/3 cup diced fresh strawberries
2 tsp strawberry jello powder
1/2 tsp vanilla extract
1/2 cup heavy whipping cream
1 egg, lightly beaten
1/2 cup powdered sugar
2 tsp milk

Preheat oven to 425 F.  Combine flour, sugar, salt and baking powder in a mixing bowl.  Cut in the butter with a pastry blender until resembles a coarse meal.  


Add the jello powder and the strawberries, and stir to coat the berries with flour and evenly distribute.  Add the vanilla, cream, and egg and stir just until the cream is no longer wet with a wooden spoon.  There will be flour at the bottom of the bowl.  


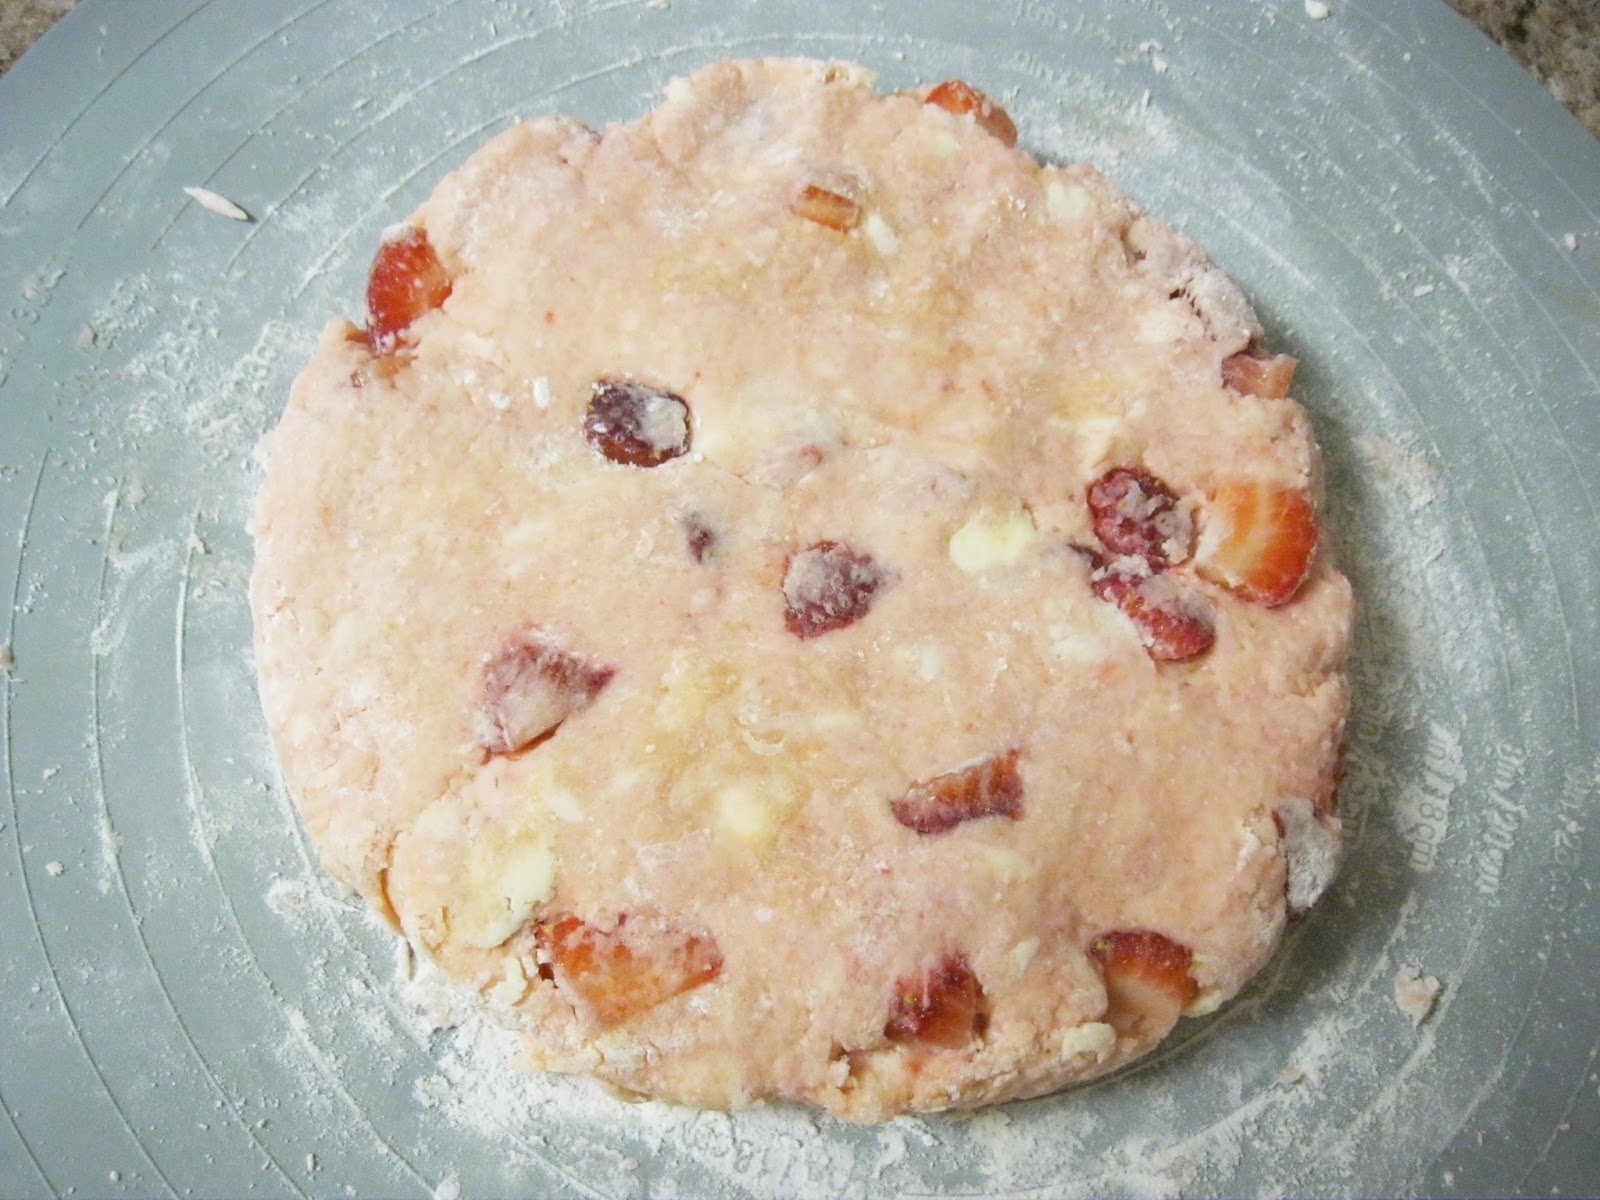
Lightly flour a work surface and turn out the dough.  Using the palm of your hand knead 8-10 times until the the flour is all incorporated.  Pick up the dough and lightly flour the surface again.  


Shape the dough into about a 6" disk and flatten with your hand.  


With a sharp knife cut into 8 wedges.  


Place each wedge on a stone or baking sheet lined with parchment paper spacing about 2" apart and bake for 20-25 minutes until starting to brown and the top feels solid and hollow when tapped with your finger.


Remove the cooked scones from your baking sheet to a cooling rack and let cool completely.  Meanwhile mix the powdered sugar and the milk to make the glaze.  If it is too thick add a little more milk.  Drizzle the glaze over each scone and serve when the scones are completely cool.  You can eat them right away if you want, but I like the strawberries better cold than still warm.

Cinnamon Sugar Pumpkin Donuts

I picked up this cute little Sunbeam donut maker at Target.  I paid less than $20.  It is like the cake ball makers and works just like a waffle iron.  It is super easy to use and these little donuts were super tasty.  I know it's not fall but I think pumpkin should be enjoyed year round.  And regardless, these little guys disappeared within a day which is pretty sad considering there were over 20 donuts and there are only 4 of us...


Print Recipe

Cinnamon Sugar Pumpkin Donuts

2 eggs, beaten
1 cup granulated sugar
2 Tbsp oil
1/2 cup buttermilk
1 cup canned pumpkin
3 cups all purpose flour
2 tsp kosher salt
4 tsp baking powder
1/2 tsp baking soda
1/2 tsp nutmeg
1 tsp ground cinnamon
1/4 tsp ground ginger

3 Tbsp melted butter
1/2 cup granulated sugar
2 tsp ground cinnamon

Plug in your donut maker to preheat.  Or preheat your oven as directed with non-stick donut pans.

In a mixing bowl beat the eggs and sugar until light and fluffy.  Add in the pumpkin, oil, and buttermilk.  Mix until all ingredients are evenly incorporated.  In a separate bowl mix the flour, salt, baking powder, baking soda, nutmeg, 1 tsp cinnamon, and ginger.  Combine the dry ingredients with the wet ingredients and stir until all the flour is incorporated in the batter.

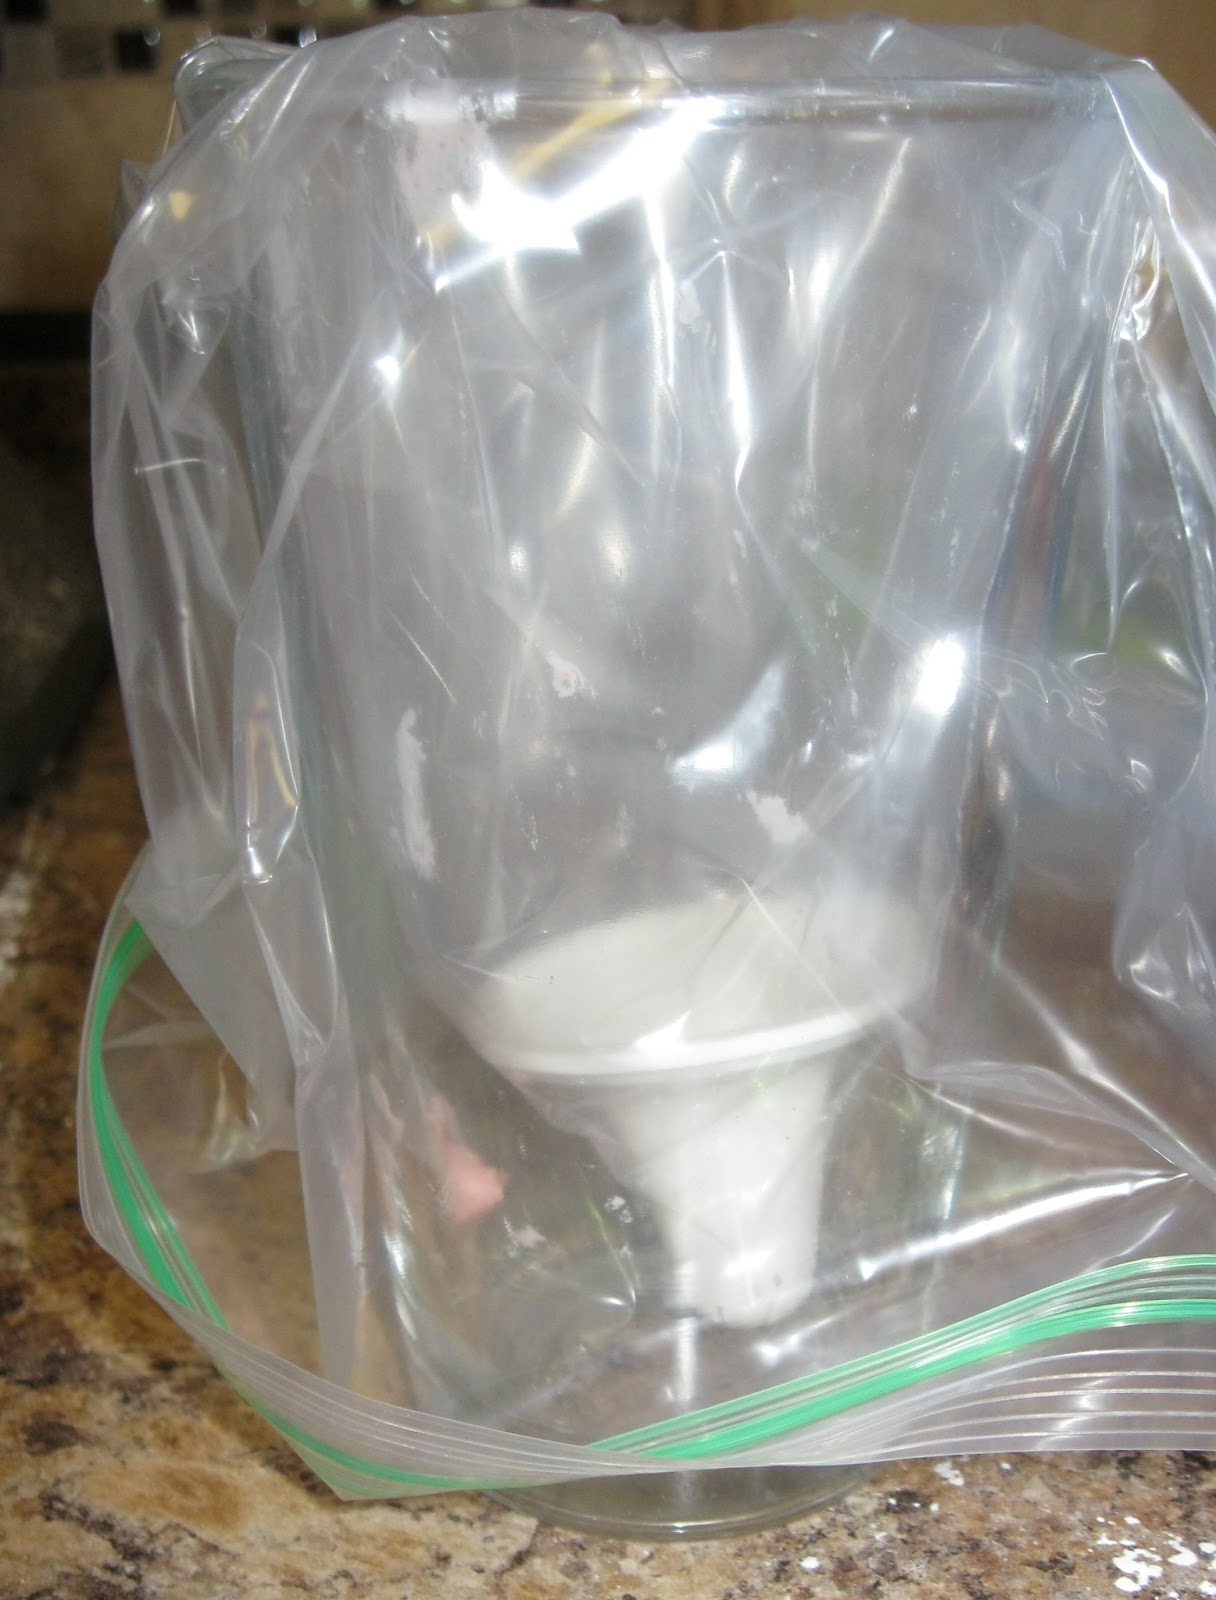
Take a gallon size zip top bag and with your hand in one corner press down inside a glass and pull the edges over the rim of the glass.  Fill with donut batter.  Open the lid of the donut maker and spray with non-stick cooking spray.  With a pair of scissors cut a 1/4-1/2 inch hole from the corner of the bag.  Pipe a full circle of batter into each circle, the batter should be a little taller than the lip of the mold or you will not have nice fully shaped donuts.  Close the lid and bake until the green light illuminates.  

Melt the butter in a bowl big enough to fit a donut.  In a separate bowl combine the cinnamon and sugar.

With the edge of a plastic knife pop out each donut and place on a plate.  Fill each donut mold with more batter and close the lid.  Refill your piping bag as needed.  Dip each cooked donut top into melted butter, then into the cinnamon sugar and place on a serving plate.  Repeat until all the batter is used.

(My boys seemed to think that both sides needed cinnamon sugar, but they ate these just fine, I figured if they were eating it without both sides coated then they didn't really need the extra sugar!)

Yield: 20-24 small donuts

Monday, February 11, 2013

Puff Pancake Super Strawberry Split

This is my 101st post! Thank you for coming to my blog and encouraging me to keep going!

These are a favorite at my house.  When birthday's come around you can be sure I will either be making flat pancakes or these fun puffed pancakes.  Be prepared to be the world's greatest Mom!

I was getting everything ready to post this recipe and I asked my son what I should name it and he came up with Puffed Pancake Super Strawberry Split.  Not to bad, I'm glad he's creative because I'm sure I wouldn't have come up with anything so fun... This would probably be great with ice cream too though I've never tried it.
 
Print Recipe

Puff Pancake Super Strawberry Split

2 Tbsp butter or margarine, melted and cooled
6 eggs, beaten
1 cup milk
1 cup flour
1 tsp kosher salt
1/2 tsp vanilla extract
1 quart fresh strawberries, washed, stemmed, and quartered
1 Tbsp fresh lemon juice
1 Tbsp powdered sugar
Whipped cream
Additional powdered sugar

Grease a 9" cast iron skillet with non-stick cooking spray and place on the middle rack in your oven.  Preheat to 425 F for 10 minutes.  (If you don't have a skillet you can use a glass baking dish or a pie plate just don't preheat.)

In a Mixing bowl combine the eggs, milk, vanilla, and butter, whisk well.  Add in the flour and salt and whisk the batter until smooth and lots of small bubbles have formed.


With hot pads remove the skillet from the oven.   Stir the batter once more and pour all at once into the pan.  Place back into the oven and bake for 25-30 minutes until the pancake is puffed and golden brown and no longer looks doughy in the middle.


Meanwhile wash and cut the berries and place in a medium bowl with the lemon juice and powdered sugar.  Stir to coat all the berries and let macerate while the pancake finishes cooking.  It will make it's own juice.  The berries in the picture were plain because I was doing the dishes while the pancake was cooking and my kids wanted to eat immediately.  Go figure...

Remove the pancake from the oven.  It will fall quickly so make sure your kids get to see it while it is still puffy they will think it's neat.  With a sharp knife cut into wedges. Spoon a few spoonfuls of strawberries on each wedge, sprinkle with powdered sugar, and a dollop of whipped cream if desired.

Shared @ Sweet & Savory Saturdays, Happy Hour Friday, I’m Lovin’ It Party, Foodie Friday, Party Time, Friday Favorites, Linky Party, Friday Food Frenzy, Weekend Potluck, Your Great Idea Link Party, Strutt Your Stuff, A Pinteresting Party, Say Gday Saturday, Sunday Showcase Party, Submarine Sunday, Manic Monday, Craftastic Monday, Market Yourself Monday, Monday Funday Link Party , Made By You Monday, Moonlight and Mason Jars, In and Out of the Kitchen, Tuesday Talent Show, Handmade Tuesdays, Two Cup Tuesday, Totally Tasty Tuesdays, An Oldie but Goodie, Get Your Craft On, All My Bloggy Friends, Take a Look Tuesday, Tell Me Tuesday, Iron Chef Mom Strawberry BattleWow Me WednesdayCast Party WednesdayLil Luna Link PartyWicked Good Wednesday’sOff the Hook Link PartyYour Best WeeklyWonderful Food WednesdayFlusters Creative Muster PartyFrom Dream to RealityTasty ThursdayTaste and Tell ThursdaysPinterest Power, Bloom Design Link Party

Friday, February 8, 2013

Made from Scratch Red Velvet Cupcakes with Cream Cheese Frosting

I have never been a fan of Red Velvet cupcakes so when I was asked to make some I wasn't sure how it was going to go.  I knew I didn't want to just use a cake mix and so after searching through several recipes I found one that was promising.  I made a few adjustments and to my surprise, I actually liked them!  I hope you do too.

Scratch Red Velvet Cupcakes with Cream Cheese Frosting

1/2 cup butter (1 stick), softened
1 1/2 cup granulated sugar
2 eggs
1/4 cup + 1 Tbsp unsweetened cocoa powder
1/2 tsp red gel food coloring
2 tsp vanilla extract
1 cup buttermilk
2 1/4 cups flour
1 tsp salt
1 tsp baking soda
1 Tbsp white vinegar

Cream Cheese Frosting:
1/2 cup butter (1 stick), softened
1 8 oz package cream cheese, softened
5-7 cups powdered sugar
1 Tbsp vanilla extract

Preheat oven to 325 F.  In a large mixing bowl or Kitchen Aid fitted with the whisk attachment cream butter and sugar.  


Add the eggs and beat well until creamy.  Scrape the sides of the bowl.  


Add the cocoa powder and mix on low, gradually increasing speed until it is all incorporated.  Add the vanilla and red food coloring, mix well and scrape down the sides of the bowl.  


Add the buttermilk and mix on low until fully incorporated. Add 1/2 of the flour and mix until fully blended.  Add the remainder of the flour and mix.  


Scrape the sides of the bowl and add the salt, baking soda, and vinegar.  Mix again until the batter is smooth.


Line two muffin tins with paper liners or spray with non stick cooking spray.  With a large scoop fill each cup 2/3 of the way with the cake batter.  Bake for 18-22 minutes.  I turn the pans the last two minutes of cooking to help the cupcakes brown evenly.  The cakes are done when a toothpick inserted in the center comes out clean or with a few dry crumbs.  Allow to cool 3-5 minutes in the pan, then remove to a cooling rack to finish cooling completely.


In a large bowl or Kitchen Aid Mixer fitted with the whisk attachment beat the butter and cream cheese until smooth, scraping the bowl occasionally.  Add the vanilla and gradually add the powdered sugar until it reaches your desired consistency.  Beat an additional few minutes to make the frosting light and fluffy.  Frost each cupcake and sprinkle with colored sugar if desired.


Recipe slightly adapted from the Brown Eyed Baker:

Scratch Red Velvet Cupcakes with Cream Cheese Frosting

1/2 cup butter (1 stick), softened
1 1/2 cup granulated sugar
2 eggs
1/4 cup + 1 Tbsp unsweetened cocoa powder
1/2 tsp red gel food coloring
2 tsp vanilla extract
1 cup buttermilk
2 1/4 cups flour
1 tsp salt
1 tsp baking soda
1 Tbsp white vinegar

Cream Cheese Frosting:
1/2 cup butter (1 stick), softened
1 8 oz package cream cheese, softened
5-7 cups powdered sugar
1 Tbsp vanilla extract

Preheat oven to 325 F.  In a large mixing bowl or Kitchen Aid fitted with the whisk attachment cream butter and sugar.  Add the eggs and beat well until creamy.  Scrape the sides of the bowl.  Add the cocoa powder and mix on low, gradually increasing speed until it is all incorporated.  Add the vanilla and red food coloring, mix well and scrape down the sides of the bowl.  Add the buttermilk and mix on low until fully incorporated. Add 1/2 of the flour and mix until fully blended.  Add the remainder of the flour and mix.  Scrape the sides of the bowl and add the salt, baking soda, and vinegar.  Mix again until the batter is smooth.

Line two muffin tins with paper liners or spray with non stick cooking spray.  With a large scoop fill each cup 2/3 of the way with the cake batter.  Bake for 18-22 minutes.  I turn the pans the last two minutes of cooking to help the cupcakes brown evenly.  The cakes are done when a toothpick inserted in the center comes out clean or with a few dry crumbs.  Allow to cool 3-5 minutes in the pan, then remove to a cooling rack to finish cooling completely.

In a large bowl or Kitchen Aid Mixer fitted with the whisk attachment beat the butter and cream cheese until smooth, scraping the bowl occasionally.  Add the vanilla and gradually add the powdered sugar until it reaches your desired consistency.  Beat an additional few minutes to make the frosting light and fluffy.

Yield: 24 cupcakes

Raspberry Devil Cupcakes

I just love raspberries.  Raspberry Jam, Raspberry Shakes, and now... Raspberry frosting!!  Talk about restraint when I was making these.  I just wanted to eat it out of the bowl.  And you can't go wrong with anything chocolate right?  So as a special treat for my Pinterest Party tonight I made these to share.  If they make it that long...


Raspberry Devil Cupcakes

1 15.25oz box Devils Food Cake
1/2 cup oil or melted butter, cooled
3 eggs
2 tsp vanilla
3/4 cup milk
1 cup frozen raspberries

Chocolate Ganache
1/2 cup semi-sweet chocolate chips
1/4 cup heavy cream

Raspberry Buttercream Frosting
1/2 cup (1 stick) butter, softened
2 tsp vanilla
1/4 cup frozen raspberries
1 Tbsp hot water
3-5 cups powdered sugar

Preheat oven to 325 F.  Place the 1 cup frozen raspberries in a small bowl and microwave for 30 seconds.  Stir and microwave for another 30 seconds until they are thawed and releasing their juice.  In a blender or small food processor puree the berries.  The berries should yield 1/2 cup of puree.

In a large mixing bowl empty the cake packet.  Add the oil, eggs, vanilla, milk and raspberry puree.  With an electric mixer mix on low for about 20 seconds then on medium speed for 2 minutes.  Line two muffin tins with paper liners or spray with non stick cooking spray.  Using a large scoop fill each cup 2/3 full with batter.  Bake for 18-22 minutes until done.  I turn my pans for the last 2 minutes of baking to help brown evenly. The cakes are done when a toothpick inserted in the center comes out clean or with a few dry crumbs.  Allow to cool 3-5 minutes in the pan, then remove to a cooling rack to finish cooling completely.

Place the chocolate chips in a mixing bowl.  Heat the cream in a small saucepan just until bubbles start to form around the sides.  Don't boil.  Pour the cream all at once over the chocolate chips and whisk to combine.  If you don't have the cream warm enough, you can microwave in 15 second increments and whisk again until the chocolate is melted.  Let cool for about 5 minutes.  Dip the top of each cupcake in the ganache and spread with a knife if necessary.  Let set.

To make the butter cream mix the butter with an electric mixer for a minute or so until smooth.  Microwave the 1/4 cup of raspberries for 30 seconds, stir and return to the microwave for an additional 30 seconds until completely defrosted and starting to release juices.  Add the raspberries and vanilla to the butter and mix.  Add the powdered sugar a little at a time until you reach your desired consistency.  Add the Tbsp of water with the third cup of sugar.  If the frosting is too thick, add more water in teaspoonfuls until the frosting spreads how you want it to.

The ganache is sticky so it really works better to pipe the frosting onto the cupcakes.  If you don't have a decorating bag you can use a gallon size zip top bag inverted into a glass.  Cut one corner and pipe.  Or before adding your filling snip one corner of the bag and place your desired tip in the hole.  Fill with frosting and decorate.

Yield 20-24 cupcakes


Shared @ Sweet and Savory SaturdaysHappy Hour FridayI’m Lovin’ It PartyFoodie FridayParty TimeFriday FavoritesLinky PartyFriday Food FrenzyWeekend Potluck, Riverton Housewives Round Up  Your Great Idea Link PartyStrutt Your StuffA Pinteresting PartySay Gday SaturdaySunday Showcase PartySubmarine SundayManic MondayCraftastic MondayMarket Yourself MondayMonday Funday Link Party Made By You MondayTried and True Recipes, Monday Link PartyMoonlight and Mason JarsIn and Out of the KitchenTuesday Talent ShowHandmade TuesdaysTwo Cup TuesdayTotally Tasty TuesdaysAn Oldie but GoodieGet Your Craft OnAll My Bloggy FriendsTake a Look TuesdayTell Me Tuesday, Wow Me Wednesday, Cast Party Wednesday, Lil Luna Link Party, Wicked Good Wednesday’s, Off the Hook Link Party, Your Best Weekly, Wonderful Food Wednesday, Flusters Creative Muster Party, From Dream to Reality, Tasty Thursday, Taste and Tell Thursdays, Pinterest PowerBloom Design Link Party, Food on Friday

Print Friendly

Related Posts Plugin for WordPress, Blogger...