Thursday, January 31, 2013

White Balsamic Vinaigrette

I love a good salad, but sometimes dressings can be a little blah.  I prefer to make my own because I know what is going into it and I can add more of what I like and take away what I don't.  This dressing has a nice spicy tang that pairs beautifully with romaine, mixed greens, or spinach and fresh fruit combinations.  The tang of the white balsamic cuts the sweet of the fruit but isn't so overpowering you cannot taste the good stuff you spent the time to add to your salad.  If you aren't normally a salad eater, try this dressing and you may just change your mind.

White Balsamic Vinaigrette

1/3 cup sugar
1 tsp poppy seeds
1/2 tsp paprika
1 tsp ground dry mustard
1 Tbsp grated sweet onion (I use a microplane)
1/2 tsp kosher salt
about 1/8 tsp pepper (about 5 turns fresh ground pepper)
1/2 cup white balsamic vinegar
1/3 cup sunflower or canola oil
1/3 cup olive oil

In a salad dressing shaker combine all the ingredients.  Secure the lid and shake vigorously until an even consistency.


Garlic Asparagus

When I was a kid I never really had asparagus, but it is one of my favorite vegetables as an adult.  I had never made it this way before but I figured it would be good.  Oh, it was.  I was sad I only made a 1/2 bunch.  I could have probably eaten the whole bunch just by myself. Try it, it's good.


Garlic Asparagus

1 Bunch of asparagus washed and trimmed
1 Tbsp olive oil
pinch kosher salt
black pepper to taste
2 cloves garlic, pressed or minced
1/2 cup chicken broth or 1/2 tsp chicken bouillon mixed with 1/2 cup boiling water

Bring a large skillet up to heat over medium high.  Drizzle the olive oil into the pan and add the garlic stirring with a wooden spatula to keep from burning.  Add the asparagus, season with salt and pepper and saute about 3 minutes.  Pour in the chicken broth, cover and cook an additional 3-4 minutes until the asparagus is crisp tender.  Drain the broth and serve warm.

Wednesday, January 30, 2013

Biscoff Oatmeal Cookies

My husband's favorite cookies are peanut butter, I pretty much like anything with oatmeal in it.  My oldest son is happy with just about everything and my little one won't eat peanut butter or chocolate.  Sometimes finding a cookie recipe that will please everyone can be a little daunting.

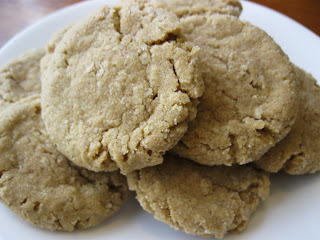
However, everyone loves those delicious little Biscoff cookies that you get when you fly on Delta.  If you haven't discovered it yet, they make Biscoff spread!  It is the same consistency as peanut butter or Nutella.  So I took our favorite cookie recipes and combined them to make these dreamy little pieces of cookie heaven.  That will be sure to please everyone.


Biscoff Oatmeal Cookies

1/2 cup Biscoff spread
1/2 cup softened butter
1 cup brown sugar
1 egg
1 tsp vanilla
1 1/4 cups flour
1 cup quick oats
1/2 tsp baking soda
1/2 tsp kosher salt
1/4 cup granulated sugar

Preheat oven to 350 F.  In a large mixing bowl cream the biscoff spread, butter, and brown sugar.  Scrape the sides of the bowl and add the egg and vanilla, beat well until light and fluffy.  In a separate bowl combine the flour, oats, baking soda, and salt and mix with a spoon.  Gradually add the dry ingredients to the butter mixture about a third at a time.  Scrape the sides of the bowl and mix just until the dough is a uniform consistency. 


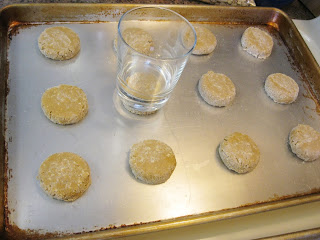
 Using a medium scoop, scoop out Tablespoon sized domes of dough and roll in sugar.  Arrange on an ungreased cookies sheet leaving room for the cookies to spread when baking.


Before baking press with the palm of your hand or the bottom of a glass.  


Bake for 8-15 minutes until set.  I bake for 8 minutes because I like them soft and chewy and just barely starting to brown.  For a crispier cookie bake up to 15 minutes.  


Let cool on the baking sheet about 2 minutes then remove to a cooling rack. Or to your mouth...


Biscoff Oatmeal Cookies

1/2 cup Biscoff spread
1/2 cup softened butter
1 cup brown sugar
1 egg
1 tsp vanilla
1 1/4 cups flour
1 cup quick oats
1/2 tsp baking soda
1/2 tsp kosher salt
1/4 cup granulated sugar

Preheat oven to 350 F.  In a large mixing bowl cream the biscoff spread, butter, and brown sugar.  Scrape the sides of the bowl and add the egg and vanilla, beat well until light and fluffy.  In a separate bowl combine the flour, oats, baking soda, and salt and mix with a spoon.  Gradually add the dry ingredients to the butter mixture about a third at a time.  Scrape the sides of the bowl and mix just until the dough is a uniform consistency.

Using a medium scoop, scoop out Tablespoon sized domes of dough and roll in sugar.  Place on an ungreased cookies sheet and press with the palm of your hand or the bottom of a glass.  Bake for 8-15 minutes until set.  I bake for 8 minutes because I like them soft and chewy and just barely starting to brown.  For a crispier cookie bake up to 15 minutes.  Let cool on the baking sheet about 2 minutes then remove to a cooling rack.

Makes 2 dozen medium cookies.

Tuesday, January 29, 2013

Divergent by Veronica Roth

This book is definitely on my favorite book list!  If you were a fan of the Hunger Games, this book will knock your socks off.  It was such a fast read and a good story.  I never wanted to put it down.  I think I completely neglected my kids to read it, especially since I flew through it in about 2 days quickly followed by the sequel Insurgent.  I am anxiously awaiting the release of the third book.


Divergent by Veronica Roth

The main character in this story is Beatrice Prior.  She lives in a post-apocalyptic society in which the people are divided into different factions based on a specific virtue: Candor (honesty), Abnegation (selflessness), Amity (peace seeking), Erudite (intelligent), and the Dauntless (brave).    Each 16 year old must decide for themselves whether to stay with their current faction with their own families or if they will devote the rest of their lives to a faction that they show an aptitude for.

Beatrice makes a choice that surprises herself and her family.  She undergoes initiation for her faction which consists of intense physical tests and extreme psychological simulations.  While undergoing the initiation process she struggles to protect her dangerous secret and searches to find a friend.  Exasperating and exasperating feelings find her as she develops an unexpected romance with a boy in the new life she has chosen.

Read this book.  You will not be disappointed!


Monday, January 28, 2013

Anthem by Ayn Rand

This book was recommended to me by a new friend.  I had heard of Ayn Rand but had never before this read one of her books.  I was amazed at how much meaning there was packed within so few pages.  I quite enjoyed the book.  It gave me a greater appreciation for the blessings of living in a country with unalienable Freedoms and for the beauty of the human mind and its individual potential.

One thing I appreciated about this copy of the book is that in the back it included a section about the author in which it describes how she grew up in communist Russia and the development of her Objectivism philosophy.  Although I don't agree with everything in her philosophy the concept behind it is interesting.  And the insight brought new light and understanding to the story.


The main character is a man with no name.  In this future society has fallen into a world of sameness, there is no "I" only "we."  Their only unique identification is their number. Equality 7-2521 is punished for creative thinking, for asking questions, for trying to make things better; for daring to be different from the mindless followers that surrounded him.  He is scorned for achieving above his classmates and because of his aspirations is assigned to an occupation where he will have no opportunity to change anything.  Leadership is not interested in making a better society but only on maintaining and controlling the one they have.  The story follows the development of 7-2521 as he defies the rules and finds joy in himself as an individual and dares to love the woman of his choosing.

Saturday, January 26, 2013

Single Rise Bread Sticks

This bread stick recipe was given to me by my Mother-in-law when I got married.  It is one of those tried and true recipes that is always a winner at the table.  You can top these however you like, with parmesan, garlic and Italian seasoning, or even cinnamon sugar if you want something sweet.


The thing I love about this recipe is that it only has to rise once, for 30 minutes!  So it is reasonable to make for dinner, you don't have to plan way in advance and they still taste wonderful.  If you love fresh bread but hate the wait, try this recipe out.

One trick you can do is to raise for 20 minutes in your oven on warm and then just turn up the oven to the baking temperature.  It works if you are in a pinch, but I have found it is better not to rush bread, if you can wait to let it raise on it's own, do it.


Also, my husband likes the bottom crunchy so I spaced them out on the pan, but if you like them nice and soft pack them in close together and give them the extra time to rise, you will not be disappointed!


Bread Sticks
1 Tbsp yeast
1 1/2 cups warm water (95-110 F)
1 tsp salt
1 Tbsp honey
3-4 cups flour

In a Kitchen Aid, mix yeast, warm water, salt, and honey together until yeast starts to froth.  Add the flour starting with 2 cups then adding a little at a time until you have a nice dough that starts to pull off the dough hook.  


Roll out dough to a large rectangle about 1/4" thick.  With a pizza cutter, cut into 1" strips.  


Spray your baking pan with non-stick spray, if using a stone there is no need.  Fold each dough strip in half and twist, then place on the baking sheet.  


Repeat with remaining dough. Melt 1 1/2 Tbsp of butter or drizzle the bread sticks with olive oil and spread evenly with a pastry brush.  Sprinkle with desired toppings (parmesan, garlic butter and Italian seasoning, cinnamon sugar, poppy seeds, sesame seeds...).  


Preheat oven to 375 F and cover the bread sticks and let rise for 30-40 minutes.  Place the baking sheet in the oven and bake for 15-20 minutes or until starting to brown and done all the way through.


Bread Sticks
1 Tbsp yeast
1 1/2 cups warm water (95-110 F)
1 tsp salt
1 Tbsp honey
3-4 cups flour

In a Kitchen Aid, mix yeast, warm water, salt, and honey together until yeast starts to froth.  Add the flour starting with 2 cups then adding a little at a time until you have a nice dough that starts to pull off the dough hook.  Roll out dough to a large rectangle about 1/4" thick.  With a pizza cutter, cut into 1" strips.  Spray your baking pan with non-stick spray, if using a stone there is no need.  Fold each dough strip in half and twist, then place on the baking sheet.  Repeat with remaining dough. Melt 1 1/2 Tbsp of butter or drizzle the bread sticks with olive oil and spread evenly with a pastry brush.  Sprinkle with desired toppings (parmesan, garlic butter and Italian seasoning, cinnamon sugar, poppy seeds, sesame seeds...).  Preheat oven to 375 F and cover the bread sticks and let rise for 30-40 minutes.  Place the baking sheet in the oven and bake for 15-20 minutes or until starting to brown and done all the way through.

Friday, January 25, 2013

Ham and Cheese Pretzel Bites

The Kiddos are home from school today and I wanted to make something for lunch they would eat and not complain about.  I saw a post for Ham and Cheese Pretzel bites on Pinterest and I thought it would be the perfect thing.  So I gave it a shot.  I modified the recipe and the process a bit to make it a little simpler and they were a hit.

They boys devoured them.  My big one even said, "Mom, thanks for the delicious meal!" My little one said, "Yeah Mom, they are really good send this for my lunch to school everyday."

Well, I don't think that's going to happen, but I'm glad they liked them anyway :)


Ham and Cheese Pretzel Bites

1 cup warm milk (about 110 F)
1 Tbsp brown sugar (honey, agave nectar, or granulated sugar)

1 tsp kosher salt
1 Tbsp yeast

2 1/2 cups all purpose flour, adjusted
2 cups finely chopped ham
2 cups shredded Mozzarella or favorite cheese
2 Tbsp water
1/2 cup boiling water
1/2-1 tsp baking soda
1 egg, beaten
kosher salt for sprinkling, optional

In a large bowl or in a Kitchen Aid mix together the milk, sugar, salt, and yeast.  Stir until bubbles form and let ferment about 10-15 minutes.  Gradually add in the flour a little at a time until you have a soft dough.  Knead well.  Depending on how soft you like your dough you may need to add a little more flour, I like my dough really soft.

Grease a large glass or plastic bowl and place the dough inside, turning once to coat.  Cover and let rise for about 2 hours until bubbly and doubled.


Lightly flour your working surface and punch down the dough.  Roll out to a 12x16" rectangle.  
With a pizza cutter cut into 4 equal rectangles.  


In each row place 1/2 cup of the ham and 1/2 cup of the cheese down the center.  


Fold over 1/3 of the dough.  Dip your finger or a pastry brush in water and brush along the other long end of the dough.  Fold over and pinch to seal.  


Roll the bundle over and shape into an even loaf.  Cut into 1 inch pieces and place on a lightly greased sheet of aluminum foil or parchment paper on a baking sheet.  Cover and let rise for 30 minutes.


Meanwhile preheat oven to 450 F.  Boil 1/2 cup of water and add the baking soda stirring to dissolve.  Use a pastry brush to coat each pretzel bite with the mixture.  The original recipe calls to boil the pretzel bites before baking and if I were making regular pretzels I would have but I didn't want to loose all my filling in the water, this although not the authentic way to do it, worked great for me.

Then use the pastry brush to give each pretzel bite an egg wash with the beaten egg and sprinkle lightly with kosher or pretzel salt if desired.  Bake for about 10-14 minutes until beautiful golden brown.

Enjoy!  Oh, and be prepared for the mad dash to the kitchen and the disappearing food!


Ham and Cheese Pretzel Bites

1 cup warm milk (about 110 F)
1 Tbsp brown sugar (honey, agave nectar, or granulated sugar)

1 tsp kosher salt
1 Tbsp yeast

2 1/2 cups all purpose flour, adjusted
2 cups finely chopped ham
2 cups shredded Mozzarella or favorite cheese
2 Tbsp water
1/2 cup boiling water
1/2-1 tsp baking soda
1 egg, beaten
kosher salt for sprinkling, optional

In a large bowl or in a Kitchen Aid mix together the milk, sugar, salt, and yeast.  Stir until bubbles form and let ferment about 10-15 minutes.  Gradually add in the flour a little at a time until you have a soft dough.  Knead well.  Depending on how soft you like your dough you may need to add a little more flour, I like my dough really soft.

Grease a large glass or plastic bowl and place the dough inside, turning once to coat.  Cover and let rise for about 2 hours until bubbly and doubled.

Lightly flour your working surface and punch down the dough.  Roll out to a 12x16" rectangle.  With a pizza cutter cut into 4 equal rectangles.  In each row place 1/2 cup of the ham and 1/2 cup of the cheese down the center.  Fold over 1/3 of the dough.  Dip your finger or a pastry brush in water and brush along the other long end of the dough.  Fold over and pinch to seal.  Roll the bundle over and shape into an even loaf.  Cut into 1 inch pieces and place on a lightly greased sheet of aluminum foil or parchment paper on a baking sheet.  Cover and let rise for 30 minutes.

Meanwhile preheat oven to 450 F.  Boil 1/2 cup of water and add the baking soda stirring to dissolve.  Use a pastry brush to coat each pretzel bite with the mixture.  Then use the pastry brush to give each pretzel bite an egg wash with the beaten egg.  Bake for about 10-14 minutes until beautiful golden brown.

Pinterest Inspiration.  Thank you for the wonderful idea:
http://www.pipandebby.com/pip-ebby/2012/2/27/ham-cheese-pretzel-bites.html

Thursday, January 24, 2013

Cherry Limeaid Cupcakes

I was sitting at home this morning thinking how I could go for a Cherry Limeaid from Sonic.  But it is freezing cold outside and there are even some little snow flurries going on so, I thought I could come up with something equally tasty and maybe not quite so cold.  These cute little cupcakes are what I came up with.  What do you think?


Cherry Limeaid Cupcakes

1 box white cake mix
enough egg whites and oil to complete as directed
Limeaid (I used Simply Limeaid) enough to replace water in the directions
1/2 cup powdered sugar
1 lime, zested (1/2 tsp) and juiced (about 2 Tbsp)
1/4 cup butter, softened
about 5 cups powdered sugar, adjusted
1 tsp almond extract
1/2 tsp vanilla extract
5 Tbsp maraschino cherry juice
2 Tbsp milk

Preheat oven to 325 F.  Place paper liners in a muffin tin and using a large scoop fill 2/3 full with batter.  Bake according to the box directions about 18-22 minutes until the cupcakes test done when a toothpick inserted in the middle comes out clean.  Remove to a cooling rack and let cool for 5-10 minutes in the pan then remove to the rack.


Meanwhile in a small bowl add the powdered sugar and lime zest.  With the back of a spoon press and mix the zest into the sugar.  Add the lime juice and stir to make a glaze.  With a toothpick, poke several holes in the top of the cupcakes, then with a pastry brush, brush the glaze over the top of the cupcakes.  And then repeat for a second coat.  Let the glaze set.


In a mixing bowl add the butter and 1 cup of the powdered sugar and beat with electric beaters.  Add the extracts 1 Tbsp of cherry juice and milk, then beat again.  Alternate adding the rest of the liquid and additional powdered sugar until the frosting reaches the consistency that you like.  Mine was a pretty soft frosting.  Frost your cupcakes with a spreader or use a decorator.  The frosting is soft so leave it room to spread.

Cherry Limeaid Cupcakes


1 box white cake mix
enough egg whites and oil to complete as directed
Limeaid (I used Simply Limeaid) enough to replace water in the directions
1/2 cup powdered sugar
1 lime, zested (1/2 tsp) and juiced (about 2 Tbsp)
1/4 cup butter, softened
about 5 cups powdered sugar, adjusted
1 tsp almond extract
1/2 tsp vanilla extract
5 Tbsp maraschino cherry juice
2 Tbsp milk

Preheat oven to 325 F.  Place paper liners in a muffin tin and using a large scoop fill 2/3 full with batter.  Bake according to the box directions about 18-22 minutes until the cupcakes test done when a toothpick inserted in the middle comes out clean.  Remove to a cooling rack and let cool for 5-10 minutes in the pan then remove to the rack.

Meanwhile in a small bowl add the powdered sugar and lime zest.  With the back of a spoon press and mix the zest into the sugar.  Add the lime juice and stir to make a glaze.  With a toothpick, poke several holes in the top of the cupcakes, then with a pastry brush, brush the glaze over the top of the cupcakes.  And then repeat for a second coat.  Let the glaze set.

In a mixing bowl add the butter and 1 cup of the powdered sugar and beat with electric beaters.  Add the extracts 1 Tbsp of cherry juice and milk, then beat again.  Alternate adding the rest of the liquid and additional powdered sugar until the frosting reaches the consistency that you like.  Mine was a pretty soft frosting.  Frost your cupcakes with a spreader or use a decorator.  The frosting is soft so leave it room to spread.

Wednesday, January 23, 2013

Green Chile Chicken Enchiladas

I love Enchiladas, it is no secret.  And I don't really prefer red over green or visa versa, they are both just lovely bundles of cheesy wonderfulness.  What I make simply depends on what I have on hand.  This recipe is easy and tastes great.  Smiles all the way around which is my idea of a successful dinner.


Green Chile Chicken Enchiladas

2 10 oz cans Green Enchilada Sauce or one large can
1 4.5oz can diced green chilies, drained
2 cups shredded Monterrey Jack Cheese
1/2 cup shredded Cheddar Cheese
Tortillas (the most authentic are to use the small corn tortillas, I had the 8" flour tortillas so that is what I used)
2 boneless skinless chicken breasts
olive oil
kosher salt and black pepper to taste
1 clove of garlic, pressed
1/4 tsp ground cumin
1/4-1/2 tsp ground ancho chili powder
1/4-1/2 tsp ground chipotle pepper
1/4 tsp ground coriander (optional)
Juice of 1/2 a lime (optional)

Preheat your oven to 400 F.  Spray a 9 x 13" baking pan with non-stick cooking spray.

Heat a skillet over medium high heat and drizzle with about a Tbsp of olive oil.  Cook the chicken seasoned with the salt and pepper until done.  Turn off the burner.  Shred the chicken.

*I found a cool trick on Pinterest about how to shred chicken fast, I don't know why I didn't know about it before.  Genius!  Put the chicken in the bowl of your Kitchen Aid and attach the paddle blade.  Turn on medium-medium high for about 30 seconds to a minute and voila, shredded chicken!

Turn the burner onto low.  Return the chicken to the pan.  Press the garlic into the pan and add the remaining seasonings.  Add the diced green chilies and half of a can of sauce (about 2/3 of a cup).  Add in 1 cup of the cheese and stir to combine.  Turn off the burner.

In a large shallow bowl dump in the other half of the enchilada sauce.  I make an assembly line.  I have the pan, my bowl of sauce, my tortillas and pan all close together.  Take the tortillas out of the bag and make accessible you are going to get messy :).  Take a tortilla and dip into the sauce coating one side completely.  Use your hand to spread it around if you need to.  (This step is especially important if using corn tortillas as they tend to break really easy)  Using a spoon, place desired amount of filling down the center of the tortilla. Place in the pan and wrap tightly.  Press to the end of the pan.  Repeat with the remaining filling.  Since I used large tortillas I made about 8 with my filling.

Drizzle the remaining can of sauce and any left over from your bowl over the top of the enchiladas.  Sprinkle with the remaining cheeses and bake for 20-25 minutes until the cheese is melted and the sauce is bubbly.

Tuesday, January 22, 2013

Couch Pillow

I love collecting quotes that I like.  I often don't know what I am going to do with them, but this one I thought would look cute with my Americana decor in my house.  So I found a piece of Muslin and went to work.


I started with a large piece of Muslin about 14x11.  With a pencil I wrote the words and drew the outline of the picture.  I have a cute trio of stars made of wood that I really like so I drew a trio of stars in the center then I added a few flourishes to give it a more finished look.

I used a burgundy color for the words, the flourishes and the medium star, navy blue for the large star, and a light gold color for the small star.  I back-stitched along my traced lettering and pattern.  Tying off all the ends.

Then I trimmed the muslin to an 11 x 7" piece.  I cut 2 2 x 11" pieces of dark blue fabric and 2 2 x 11" pieces of tan and red star fabric.  The back of the pillow was a piece of fabric cut to 15 x 11".

I sewed the star fabric to the top and bottom of the muslin.  Then I sewed the two sides of dark blue on.  I pinned the backing to the front, right sides touching and sewed around the perimeter leaving a 2-3" hole at the bottom.  I flipped the pillow right side out, pushing the corners out with a pencil, then I filled with batting. I used a blind stich to close the hole.

Beautiful Redemtion

Beautiful Redemption

Ok my fellow Twilight fans.  If you are looking for another good series to read check out the Beautiful Creatures books by Kami Garcia and Margaret Stohl.

My son gave me the 1st book Beautiful Creatures for my birthday and I had never heard of it before, but I flew through it in about 4 days.  I quickly went to the library and devoured the next 2 books and was so disappointed I had to wait for the 4th book to be released in October.  However it was really popular and I wasn't able to get my hands on it until January!  I should have just bought it... Anyway, it is a fun read filled with exciting characters and a quick paced story line.

A great line to live by: What is easy and what is right are never the same.

I'm so glad my son randomly happened to pick up that first book for me.


This love story takes place in a Southern small town.  Ethan meets the girls of his dreams, Lena, who unlocks a whole world that he could never imagined.  This is the fourth book in the series and the culmination of Ethan doing whatever it takes to preserve his love.  It is a wonderful, imaginative, and turbulent story that will suck you in as you read page after page to find what happens next.

Print Friendly

Related Posts Plugin for WordPress, Blogger...